

6 Holiday Crafts To Festively Decorate Your Home On Even The Tiniest Budget
This page may contain affiliate links. As an Amazon affiliate, we may earn a small commission for any purchases made through these links. Click here for the disclosure statement.
As the end of the year nears, it’s time to begin your holiday baking, hang up your stockings, and decorate your Christmas tree. Decorating for the holidays can fill your heart and your home with warmth, however, shopping for Christmas decor can quickly drain your wallet. Instead of sacrificing your budget for gifts, try making your own decor with these simple holiday crafts.
Holiday Wreath

A beautiful Christmas wreath wrapped with fresh pine and decorative accents can set the tone for your holiday sanctuary. This easy and affordable holiday craft only takes around 30 minutes to complete and allows you to exercise your creative muscles.
Materials Needed
Fresh or fake greenery (pine or cedar are great for creating a traditional look)
Decorative pieces (fake berries or flowers, ornaments, or ribbon)
Floral wire or fishing line
Hot glue gun
Try This:

Image: Amazon
Grapevine Wreath Form Set
Wreath forms constructed from natural materials, like grape vine, offer a blank palette that makes creating your own wreath an effortless process. They have a natural beauty that brings charm into your space, and they significantly reduce the time it takes to complete the project.

Image: Amazon
Faux Christmas Berry Stem Set
Faux greenery and stems can oftentimes become more expensive than their natural counterparts. If you’re unable to forage for fresh greenery in your area, opt for a set of fake stems that are adorned with decorative accents.
Make Your Own
Prepare your greenery by cutting your faux or fresh stems into smaller pieces around five to six inches long.
Place your cut greenery around the wreath form. When placing, make sure stems are facing the same direction. Secure with floral wire or fishing line.
Continue to wrap the wreath form in greenery until you’ve created your desired design. To completely cover the form and create a fuller look, overlap your greenery.
Arrange your decorative pieces until you’ve achieved your desired look. Once you’re satisfied with the placement of your accents, secure them with fishing line or hot glue.
Inspect your wreath from various angles to ensure it looks balanced and cohesive. Make any necessary adjustments.
Wood Slice Ornaments

A rustic twist on classic Christmas decor, wood slice ornaments are a simple holiday craft that can transform your tree into an inviting centerpiece. A fun Christmas craft to do with kids or friends, this activity doesn’t require much energy to complete, and you can create as many as your tree can hold.
Materials Needed
Acrylic paint
Glitter
Paint brushes in assorted sizes
Drill (if needed for drilling holes to add twine)
Try This:

Image: Michael’s
Pre-Drilled Wood Slice Kit
I had a bag of wood slices buried deep that didn’t have holes at the top to attach cords for displaying. To save time, opt for a set of pre-drilled wood slices. This kit also includes two types of string to easily hang.
Make Your Own
If necessary, prepare your wood slices by drilling a small hole towards the top of the disc.
Lightly sketch or trace the designs you wish to paint on each slice with pencil.
Select your paint and begin adding color to your designs. For more detailed areas, use a fine-tipped brush.
To create a more festive atmosphere, consider adding metallic or glitter accents!
Once your work of art is completely dry, seal each painting with a thin layer of Mod Podge.
Loop your twine through the hole and knot at the top.
Clay Ornaments
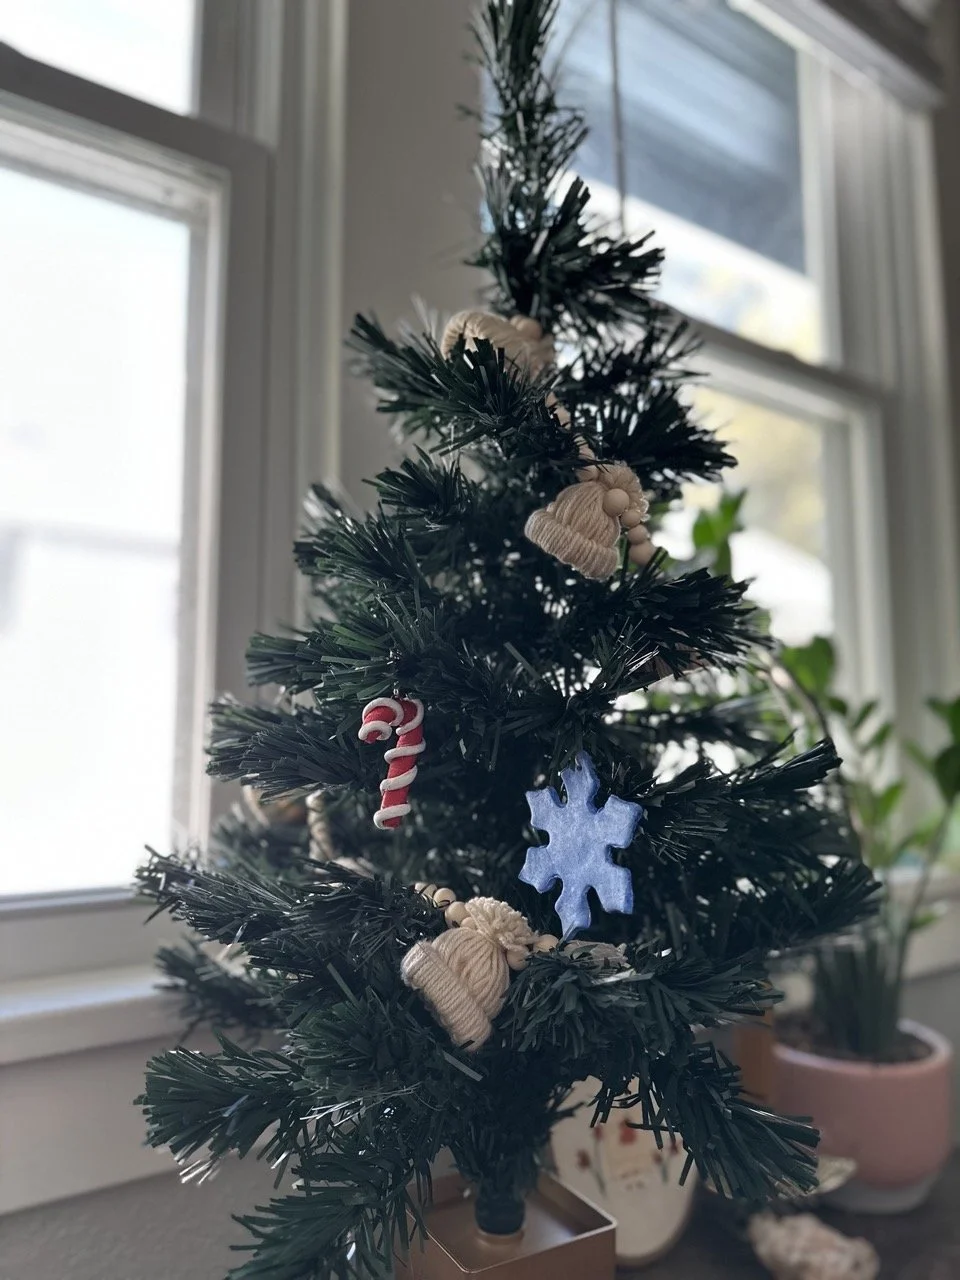
Nothing adds a more kitschy, handmade touch to your Christmas tree than an ornament sculpted from air dry clay. The perfect holiday crafts for adults and kids alike, this DIY can be as simple or advanced as you choose. If you’re an ambitious crafter, you can try free-hand sculpting your masterpieces, or, if you’re a beginner, you can choose your favorite cookie cutters to create flawless holiday shapes.
Materials Needed
Rolling pin (can use a wine bottle or any cylindrical object)
Acrylic paint
Paint brushes in assorted sizes
Mod Podge
Jump rings or 20-gauge wire
Dowel rod or straw
Pliers
Cookie cutters (optional)
Wax paper or non-stick mat
Try This:

Image: Michael’s
Air Dry Clay Set
To maximize your purchase, opt for a two-piece set of air dry clay. When stored in an airtight container, this clay can last for months to come, so you can make even more ornaments next year!
Make Your Own
Prepare your workspace by laying down a sheet of wax paper. Learn from my mistake–dry clay is messy, so this will help streamline the cleanup process.
Take a piece of clay and knead it in your hands to soften it.
With your rolling pin or other cylindrical object, flatten your piece of clay to your desired thickness. For ample sturdiness, aim for one-quarter-inch thick.
Cut out your shapes with cookie cutters or molds. If you don’t have cookie cutters on hand, begin molding your clay by hand until you’ve created your desired shape.
Create a hole to string your ornament using a small dowel rod or straw.
If you’d prefer to use a ring to support your string, push one jump ring at the top of your clay ornament. If no jump rings are available, cut a small piece of wire, bend in half, and twist the ends together until you’re left with a small loop at the top.
Smooth any rough edges with your fingers.
Place your ornaments on a flat surface and allow them to dry for 24 to 72 hours, depending on thickness.
Once completely dry, begin adding designs to each ornament with acrylic paint.
After the paint has dried, use a paintbrush to apply a smooth layer of Mod Podge over your ornament to help protect the paint.
Thread a piece of ribbon or twine through the hole you created earlier. Tie a knot at the top to secure it.
Stocking Cap Garland

The best crafts are those that can be done using discarded materials around your space. For this craft, you can find most of the materials in your bathroom or kitchen, and it can be completed in up to two hours. (However, if you have a cat in the house, your process may be hindered by their desire to chase your yarn!)
Materials Needed
Yarn
Cardboard tube
Cotton balls
Wooden beads
Needle
Embroidery floss or twine
Small book for wrapping yarn
Scissors
Try This:

Image: Michael’s
Natural Wooden Bead Set
To create a more dynamic garland, alternate the sizes of the wooden beads.
Make Your Own
Prepare Your Materials
Wrap your chosen color of yarn around a 5-inch wide surface several times. Cut in half so you have a pile of 10-inch long pieces of yarn.
This step may need to be repeated, depending on the number of hats desired and the thickness of your yarn.
Cut your cardboard tube into rings about one-half inch thick.
Create Your Hats
Take one strand of cut yarn and fold it in half, so you have two tails at the bottom and a loop at the top.
If you’re working with thinner yarn, double the strands to reduce time and create a fuller effect.
Place this folded yarn inside the cut ring, pulling the tails through the top loop. Pull it taut and repeat.
Once your cardboard ring is completely wrapped in yarn, take the strands and pull them up through the ring to hide your knots and create a folded stocking cap look.
Push one cotton ball into the opening of your hat to give your hat structure. Position your yarn so the cotton ball is concealed.
Tie one 5-inch piece of yarn around the loose strands just above the cotton ball.
Trim the top strands in an arching shape to form a small pom-pom ball.
Repeat until you’ve made your desired number of hats.
Putting It Together
Thread your needle with embroidery floss. Thread the string through one bead, then tie the string around the bead to act as a stopper.
Thread four to five wooden beads onto your string followed by a stocking cap, making sure to add your “stitch” just below the pom-pom of the cap.
Continue this pattern until you’ve reached your desired length.
Tie off your string through the final bead and create a slipknot for hanging.
Citrus Garland
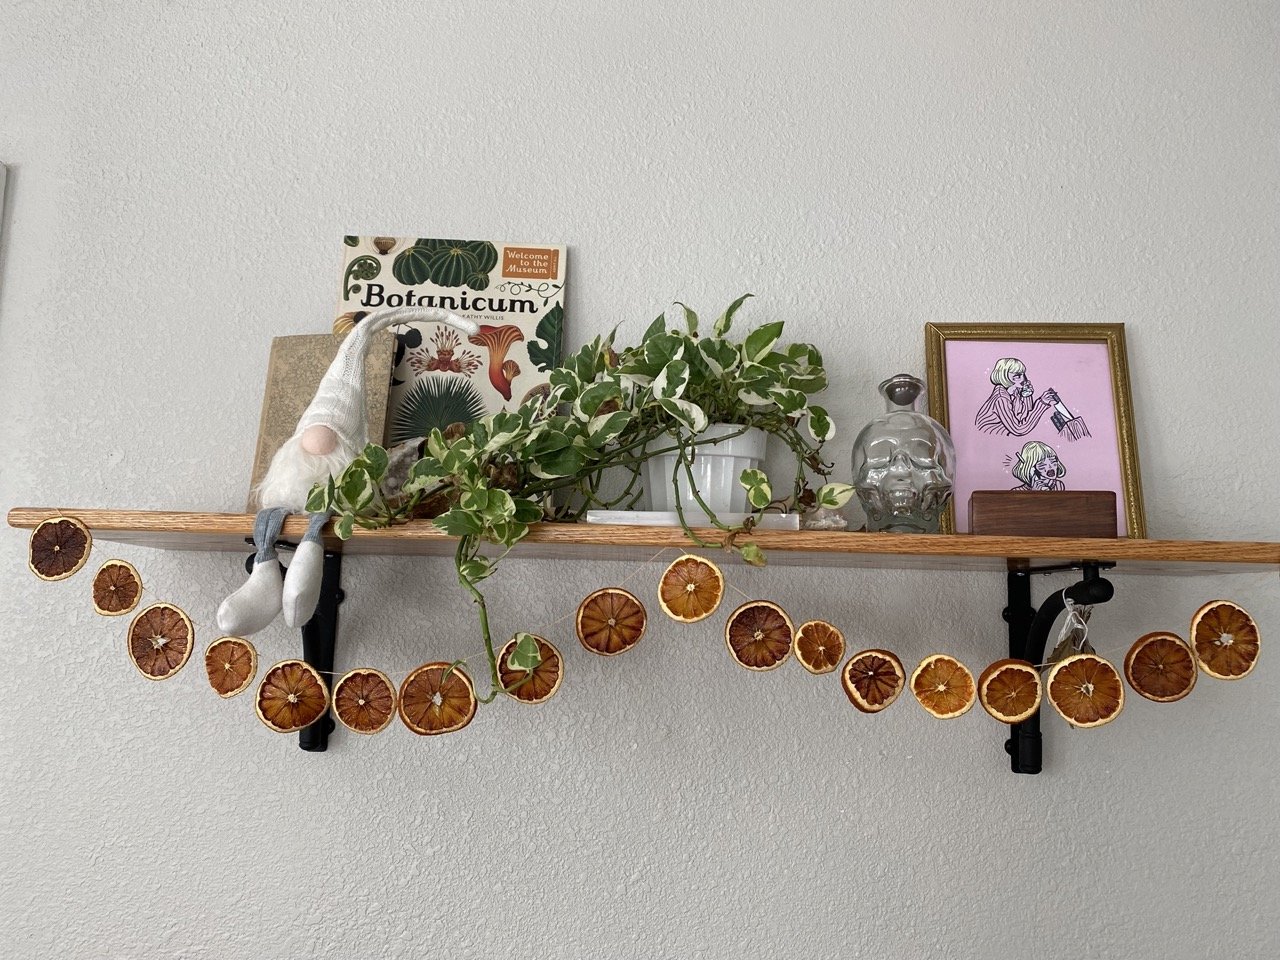
Incorporating dried citrus into your decor is a versatile way to deck the halls this holiday. Not only can you use them as an accent to your gift wrap or Christmas wreath, but you can also turn them into garland and ornaments.
Materials Needed
3-4 Oranges (lemons and grapefruits can also be used)
Twine or embroidery floss
Needle
Paper towels
Baking sheet
Parchment paper
Make Your Own
Preheat oven to 200°F.
Wash and remove dirt from each fruit.
With a sharp knife, cut fruit into slices, approximately one-quarter inch thick.
Pat each slice dry with a paper towel.
Place slices in a single layer on a baking sheet lined with parchment paper.
Put in the oven with the door slightly ajar to help the moisture escape.
These typically take four to six hours to completely dry, depending on thickness.
Once fully dried, let your slices cool completely.
Take your chosen string and tie a small loop at the end. Loop the un-tied end into the eye of your needle.
Begin threading your string through each yarn, continuing until you’ve reached your desired length.
Finish your garland off with a slipknot for hanging.